Showing posts with label shoes. Show all posts

March 4, 2012

In the Name of Fashion - Shoes

Orange Spiked High Heels - the shoe of the season!
Went to Bellevue Square Mall today and was extremely surprised when walking through the shoe department in Nordstroms. Granted I have been traveling a lot in the last year and some say I am a country girl, but really...when did shoes start becoming.... impossible to walk in? It was crazy enough when the spiked heals where 5 inches and you were walking on your tippy toes. Now the spikes are 7 inches on platform shoes, so you are now walking on your tiptoes and 2 inches off the ground!!! If you ask me, I woud say Urgent Cares and Emergency Rooms are going to love the revenue from this fashion statement!

When looking at this image I thought the name of these shoes should be "Buckle Up!"

Athletic shoes going electric this season!


Then I had to laugh when I walked into the athletic shoes area. The colors are 'electric'. These shoes have the thinest soles possible. It is like you are walking on the ground practically. I am sure you will feel every pebble you step on. What a contrast!

Filterstorm was used to process these images.


Online courses start again TOMORROW on March 5th. Last day to sign up! Next course starts in April.

The Last Pixel Show is pleased to announce two destination iPhone Photography Workshops. The first is in Napa Valley this April and the second is in Palouse this August. Please click the images on the sidebar links for more information. You can also go directly to the website at http://thelastpixelshow.org.

July 19, 2011

Photo Contest - Winner receives free iPhoneography 101 Course


written by fxPhotoStudio

Creative challenge: win free iPhoneography course

Either you consider yourself a pro iPhoneographer or still a beginner, it is always good to get some additional practice and learning. Here is an awesome creative challenge for you with a chance to get FX Photo Studio PRO for Mac and - attention here - FREE iPhoneography 101course from a great photographer Teri Lou Dantzler.
Rules are as simple as ABC. Here are pictures, taken by Teri Lou (check more on our Facebook page). Pick any of these images and see what you can turn them into with the new FX Photo Studio 4.0. Apply masking, mix 194 effects and inspire the artist within. Challenge ends on August 2nd and starts from the second you read this post.
—-
When you are done with images, upload them on Facebook or submit via email(atsepko(at)macphun.com) with a subject “creative challenge”. Good news: you can use other photo apps as long as you use FX Photo Studio.


Today's blog image was captured in the Perkins House in Colfax, WA. I captured it with the HIpstamatic camera, however TimelessPhoto changed the square image into a rectangle.

Hipstamatic
PerfectPhoto
fxPhotoStudio
TimelessPhoto
Blender
Filterstorm
Grungetastic
DynamicLight

When processing this image I just couldn't stop. I loved the original image straight out of Hipsta and then I loved the effect with just fxPhotoStudio and TimelessPhoto. But then I wanted to use PencilPaint and AncientCanvas filters to give more color and dimension to the image. Next I had to use Filterstorm to dodge and burn in places. Then I wanted to add more to the rather large white frame,  so that is why I used Grungetastic. At this point I thought it looked terrific until I remembered DynamicLight, so I decided to add a little bit of it too. The art of processing is addicting to me. At times I am like the energizer bunny, I just keep going and going and going....lol!


iPhoneography Classes Available Now! - next class starts August 1st - limit 6 student per course. If you would like to learn how to capture and process iPhone images beyond a basic snapshot take an Online iPhoneography Course with Teri Lou. Two courses are available iPhoneography 101 and iCreativity. Click on the direct links in the upper left hand column of this blog for information, pricing and schedule.

May 26, 2011

Step by Step iPhone App Processing

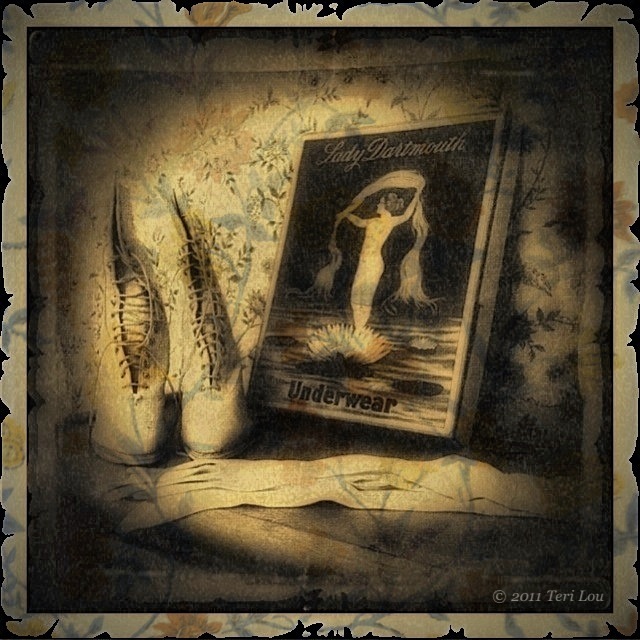
Another image from the Perkin House, Colfax, WA

Today's image was a surprise to me. From the beginning of the processing procedure, I decided I wanted to create an old photo feel, so instantly the app OldPhotoPro came to mind. (As always I sharpened the image first before applying any additional filters.) While finding that app I came across the app PhotoTreats and decided to remind myself to what was available there. I found a filter that super saturated the image and decided to apply it before bringing it into OldPhotoPro.
In OldPhotoPro I tried some various combination and instantly feel in love with the ragged frame. Even though the frame did add the appeal I was looking for I also wanted to continue playing with the possibilities of different framing options so I opened the image in fxPhotoStudio and added a thin black frame. I brought the image into OldPhotoPro again to add the ragged frame to the black portion.
Now with the thought of wanting to paint in the wall paper textureas part of the frame, I also captured that day, I once again added a frame in fxPhotoStudio but this time in white and wider so it would show through when blended in the app Blender.
Each time I processed the image in OldPhotoPro it became more aged and darker. I definitely liked the aged look but thought it was too dark so I used the app DynamicLight to brighten it a bit. Next I sharpened the image again using Perfect Photo. Then I was ready to blend. Using the simplest blending mode app, Blender, I opened the most current version and the wallpaper texture. My plan, as I stated earlier, was to paint the wallpaper just into the frame, however when I chose the multiply option I just loved how the wallpaper blended so well into the whole image - Surprise!
Even though I loved the look on the wallpaper on the image, I didn't want it to be as strong as the portion on the frame so next I opened the image with the blended wallpaper and the one just prior to that in Filterstorm and with a very low opacity brush lightened the inside of the image.
As always I added my copyright watermark with Impression.

This is just a concept that I wanted to share with all of you. It can be used in several ways. I hope this demonstration and explanation motivates and inspires you to see what is possible. I have many more lessons like this in my iCreativity course that is starting Tuesday May 31st.

For the step by step images I used the app Diptic.

original Hipsta Dream Canvas,  OldPhotoPro, fxPhotoStudio, OldPhotoPro

FxPhotoStudio, OldPhotoPro, DynamicLight, Filterstorm


iPhoneography Classes Available Now! - next class starts May 31st. If you would like to learn how to capture and process iPhone images beyond a basic snapshot take an Online iPhoneography Course with Teri Lou. Two courses are available iPhoneography 101 and iCreativity. Click on the direct links in the upper left hand column of this blog for information, pricing and schedule.

April 4, 2011

Girly Girl


At first I saw the tights, next I saw the shoes and then I became a stealth iPhoneographer. Of course the red coat was the bonus that put it over the top!

I believe it is at moments like this when all my photographic experience comes into play:
I recognized the magic in the possibilities of this image.
I positioned myself to capture it.
I quickly opened the best camera app.
I aimed and shot.

I took a few others but it was the first image that was the best. It was instinct. It was the previous 50,000+ other photos that I took prior that prepared me for this moment. So if you question how can you be a great photographer I offer the following advice: Take lots of images and know your equipment. Have it become an extension of yourself. Only then will you be prepared for when the magic presents itself.

ProCamera
PerfectPhoto
PhotoStudio
Impression